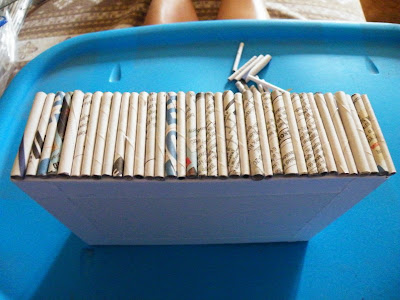
Vágjátok az újságpapírt 10 cm széles csíkokra s sodorjatok belőle pálcákat Elina útmutatója alapján. Nekem az elején nem ment, aztán Elina azt tanácsolta, fordítsak a vágás szálirányán és láss csodát, amióta függőlegesen szabdalom, megy, mint a villám. Ehhez a technikához fontos, hogy jól tartson a pálca feldarabolva is, így legalább 3 cm-enként pöttyintsetek a ragasztóval!
Cut the newspaper into 10 cm wide pieces and twist pipes from those – Elina have a video how to do that. In the beginning it was too difficult for me, but Elina said I should turn the grainline and finally I could do it. It’s really important to have stable pipes for this technic, so please glue the paper in cm wide places.
Egy vastagabb kartonból állítsuk össze a doboz alját. Kívülről ragasztgassuk össze papírlappal, azt úgyis letakarjuk majd a pálcákkal.
Glue together the bottom of the box from a thick cardboard. Glue together outside with papers, we will cover it with pipes.
Az én dobozom 5 cm magas, így 5 cm-es pálcákat szabtam.
My box is 5 cm tall, so I cut 5 cm pipes.
My box is 5 cm tall, so I cut 5 cm pipes.
Az első darabokat a bal kezemmel tartom a helyén, míg a doboz szélét körberagasztom. Pár másodperc alatt fixálódik a helyén.
I fix the first pipes with my left hand, till I’m glueing the side of the box. It needs only a few moments to clutch.
I fix the first pipes with my left hand, till I’m glueing the side of the box. It needs only a few moments to clutch.

Lemérjük, mekkora lett a dobozunk a csövecskékkel, ehhez mindkét oldalon hozzáadunk 2 mm-t és kiszabjuk a doboz tetejét. Az enyém 2 cm magas lett. Összeragasztjuk a fehér papírlapok segítségével.
Measure the whole sizes of the box with the pipes, than add 2 mm and cut the top of the box. I cut 2 cm tall box-cover. Glue together with the papers.

Ehhez a mintához előbb a két hosszabbik felére ragasztottam annyi pálcát, hogy eltakarjam a fehér papírlapokat. Ugyanennyit ragasztottam a rövidebbik oldal maradék helyére (lemértem, mekkora pálca fér be).
For this motif I glued on the longer sides as many pipes to cover the papers. I glued the same amount on the shorter sides too (I measure the gaps).

Egy hosszú pálcát szorosan az ujjam köré csavartam, mikor a végére értem, összeragasztottam. Pár másodperc és el lehet engedni, összeragadt. Felragasztom a tető közepére.
I twisted a long pipe arond my finger, when I finished, I glued it. After a few moments you can uncoop and glue it onto the middle of the top.

Ezután két centis kis mütyüröket szabtam és körberagasztottam a tető oldalát. Mivel ott még volt bőven hely, ezután a rövid csövecskék tetejére ragasztottam körben egy-egy hosszú pálcát.
Than I cut 2 cm long pipes for the side od the top. After that I cut and glued longer pipes onto the top of the small pipes.
Már csak festeni kell (esetemben dió színű fapác) és lakkozni kell. Nem tagadom, nem két perc elkészíteni, de a végeredmény kárpótol minket a sok görnyedésért:)))
You only have to dye (I used mordant dye) and lacquer it. I don’t say it’s just a few moments to create this but the payoff will compensate you:)))
You only have to dye (I used mordant dye) and lacquer it. I don’t say it’s just a few moments to create this but the payoff will compensate you:)))
And because I made this for a birthday, I made a necklace too into it.


